
How to Repair a Leaking Plumbing Vent Flashing
Stop roof leaks around a plumbing vent pipe by reseating or replacing the flashing boot, sealing correctly, and checking the surrounding shingles for damage.
Good grain. Great questions.
When rain shows up in the attic (or makes an unexplained spot on the ceiling) right below a plumbing vent pipe, the culprit is often not the pipe itself. It is the roof joint around it. That joint is handled by a plumbing vent flashing, usually a metal base with a rubber boot that seals to the pipe.
This guide sticks to the leak at the roofline: how to inspect the boot, reseat or replace the flashing, and make sure the shingles around the pipe are doing their job. (If you are looking for how to clear leaves, nests, or ice inside the vent pipe, that is a different fix for a different problem.)
One quick note on tone: when you see a “Knob note,” that is just my wooden little reminder to do the simple things correctly, because roofs punish shortcuts.
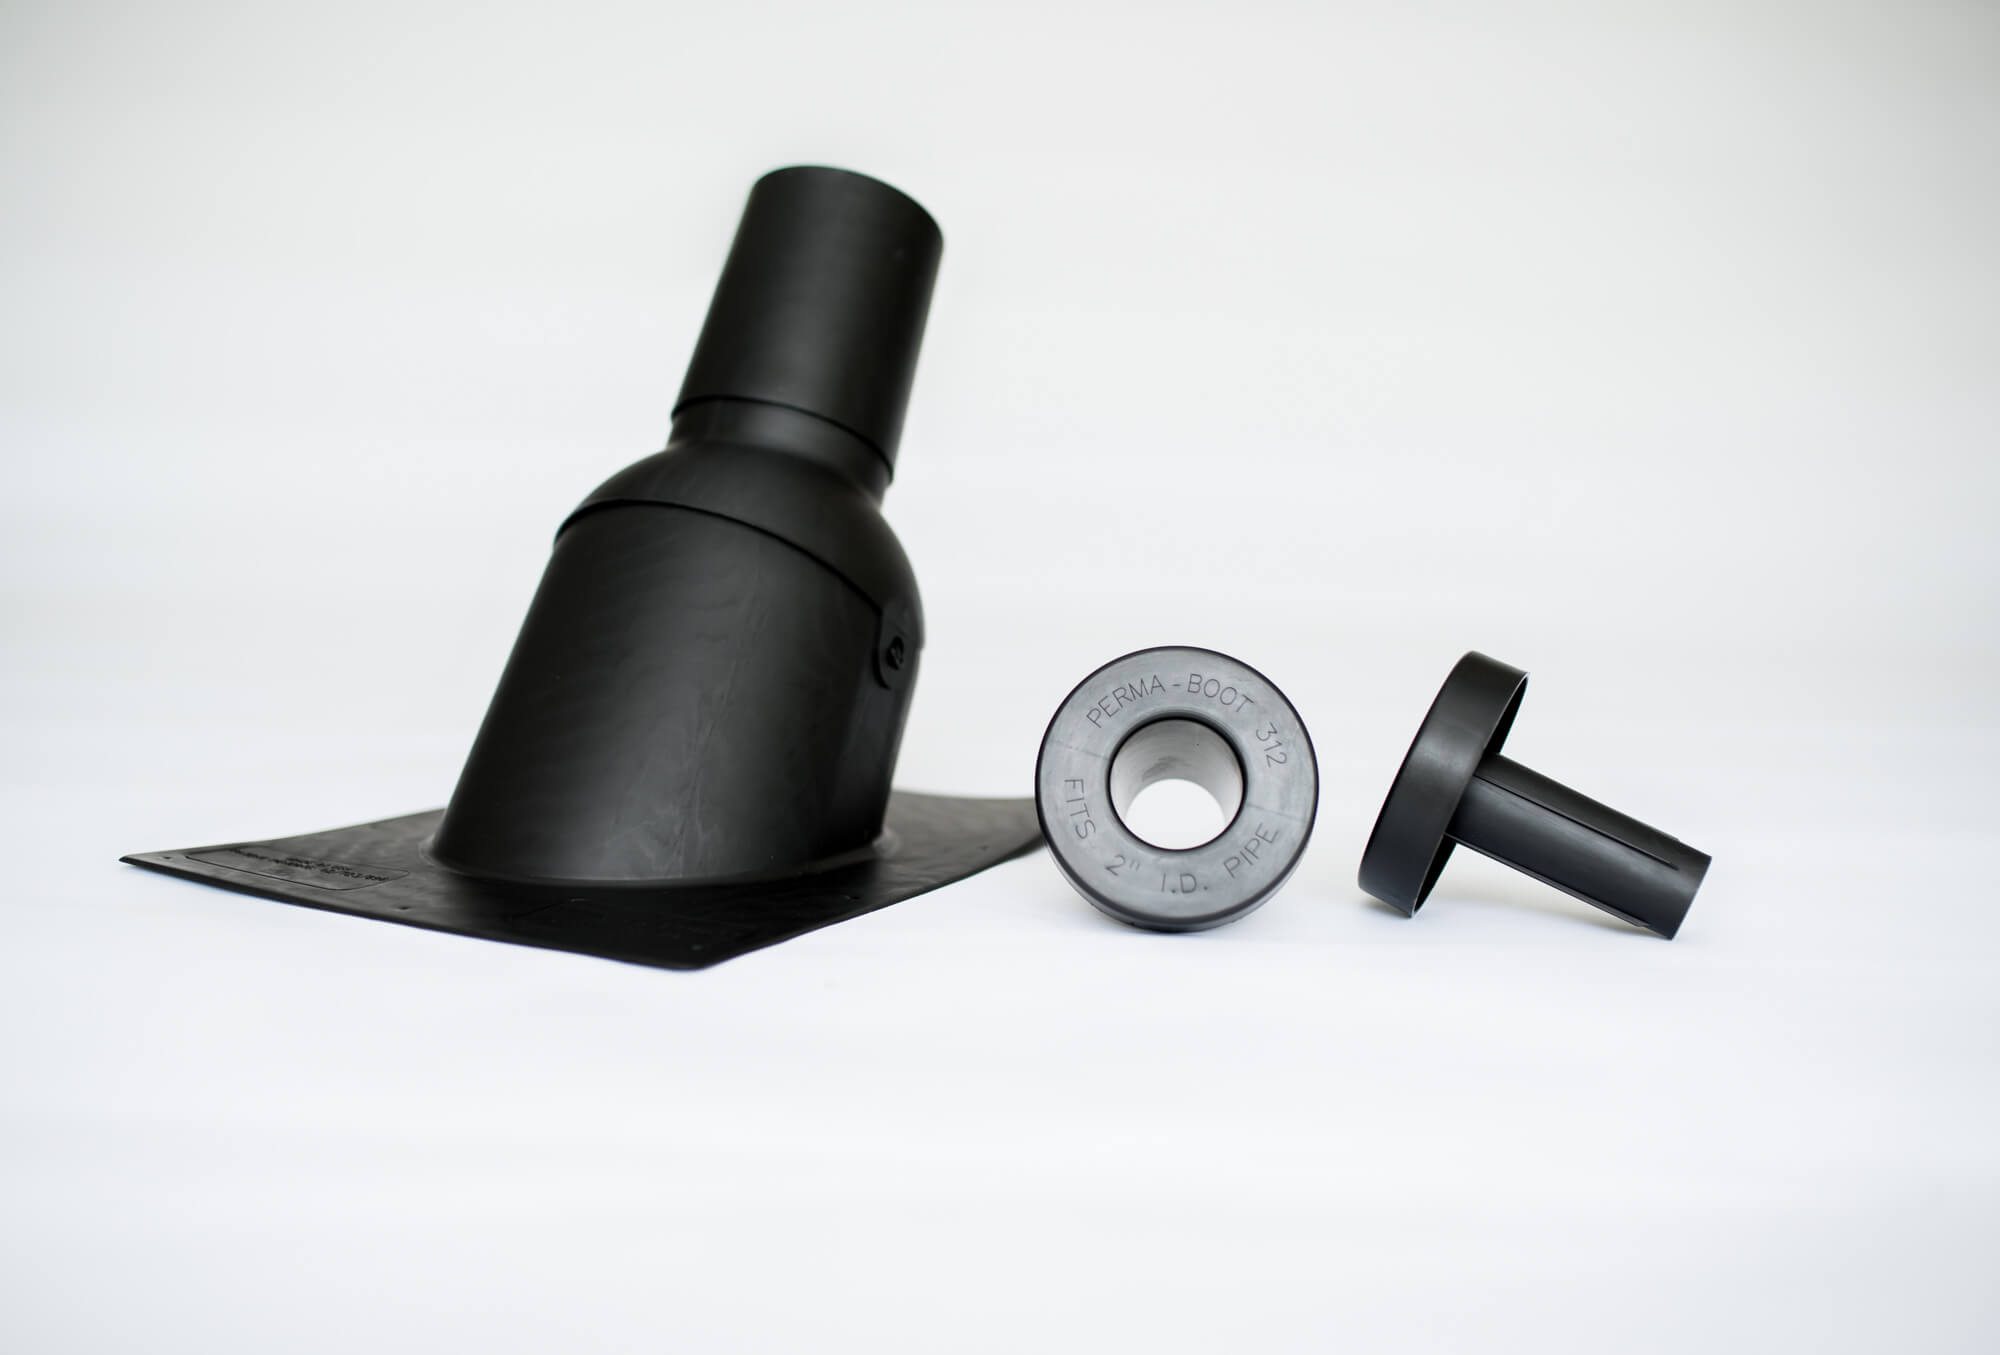
How vent flashing works
A standard plumbing vent flashing has two jobs:
- Shed water on top of the roof with a flat base that tucks under the shingles above the pipe and sits on top of the shingles below it.
- Seal to the pipe with a flexible boot (often rubber or silicone) that grips the vent pipe.
If either job fails, rain can follow gravity into the roof assembly. Common failures are a cracked boot, nails that backed out, poor shingle overlap, or old sealant that was used as a primary fix instead of proper shingle-flashing layering.
Safety first
Roofs are slippery, steep, and unforgiving. If any of these are true, call a roofer:
- The roof is steep enough that you do not feel fully stable.
- The shingles are wet, frosty, dusty, or covered in debris.
- You cannot access the area with a properly set ladder.
- The roof is very high, or you have limited footing near the vent.
Important: If you see active water dripping inside, put a bucket down, take photos, and wait for safe conditions. Rushing onto a wet roof is how a small leak becomes a big injury.
Tools and materials
Tools
- Extension ladder (properly rated)
- Work gloves and non-slip shoes
- Flat pry bar
- Hammer or drill/driver
- Utility knife with sharp blades
- Caulk gun
- Tape measure
Materials
- Replacement vent flashing boot sized for your pipe (commonly 1.5 to 4 inch; 2 and 3 inch are the usual suspects)
- Roofing sealant rated for flashing and asphalt shingles (often sold as roofing cement or roof and flashing sealant)
- Roofing nails (galvanized) if existing nails are corroded or missing
- Optional: a small piece of matching shingle if one tears during removal
Tip from a wooden mascot who likes things that fit: measure the pipe’s outside diameter and buy the flashing made for that pipe size and your roof type. For most asphalt shingle roofs, a standard rubber or silicone boot flashing is common. For metal roofs or specialty roofing, flashing types change, and you do not want an asphalt-shingle style boot improvising on a standing-seam system.
Confirm the leak source
Before you pull nails, do a quick reality check. Water can travel along rafters and show up far from the entry point.
Inside the attic
- Look for dark staining or shiny wet wood around the vent pipe where it passes through the roof deck.
- Check the underside of the roof sheathing above the pipe for drip tracks.
- If you see moisture around the pipe but not elsewhere, flashing is a strong suspect.
On the roof
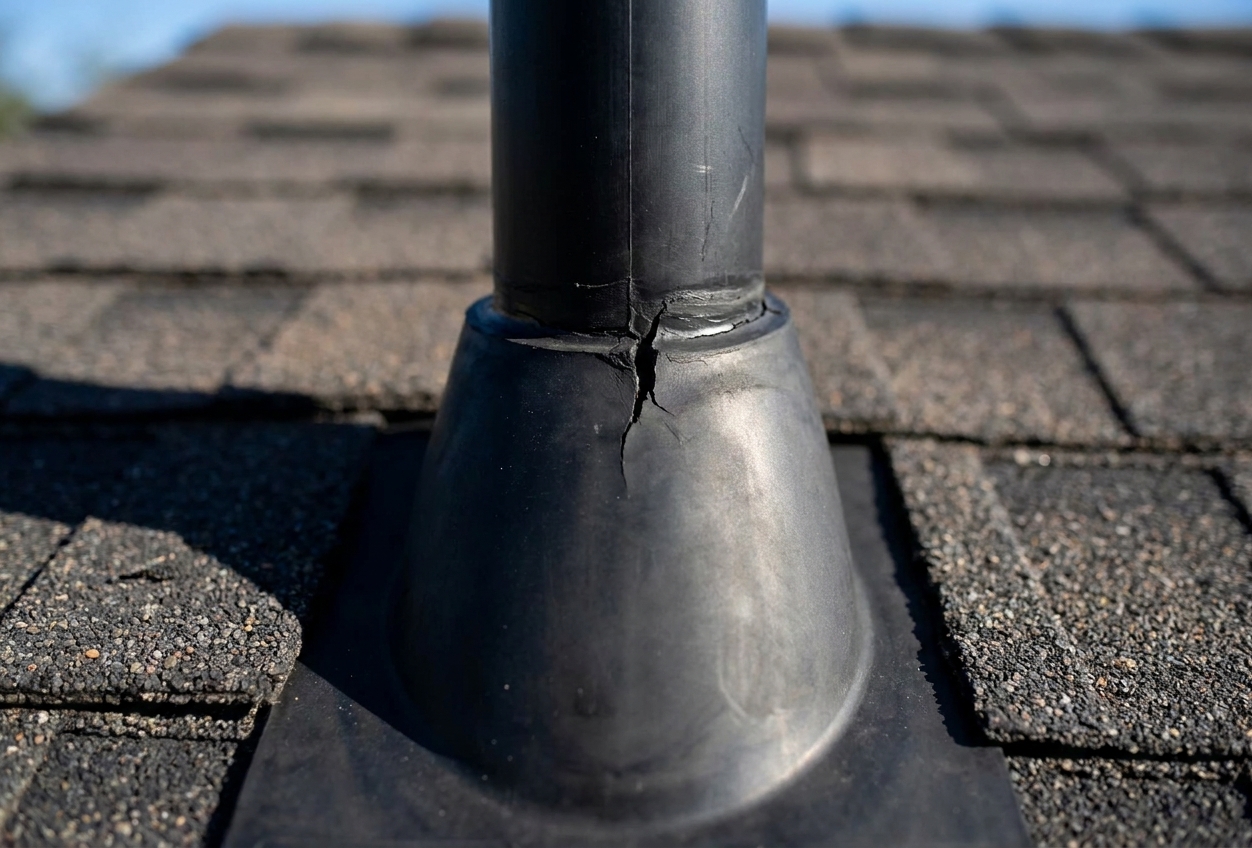
- Inspect the boot for cracks, splits, or a gap where it hugs the pipe.
- Look for lifted shingles, missing granules, or exposed nails near the flashing base.
- Check for old blobs of caulk that look like a previous quick fix. Sealant has a job, but it cannot replace correct shingle overlap.
Not always a roof leak
Sometimes the wet spot near a vent pipe is not rain at all.
- Cold-weather frost and melt: In freezing weather, warm moist air from the plumbing system can condense and freeze inside or on a cold vent pipe in the attic. When it warms up, that frost melts and looks like a roof leak. If moisture shows up mainly during freeze-thaw swings, improve attic insulation and air sealing around the pipe, and consider professional advice before tearing into flashing.
- Condensation from poor ventilation: A humid attic can condense on the pipe and roof deck. That is an attic air issue, not a boot issue.
Quick fixes vs real fixes
Sometimes you can buy time, and sometimes you should not bother.
When a reseal might be enough
- The boot rubber is still flexible and uncracked.
- The flashing base is intact and properly layered with the shingles.
- You have one obvious issue like a popped nail head or a small gap at the top edge of the boot collar.
When replacement is the right move
- The boot is dry-rotted, cracked, or split.
- The boot opening is stretched and no longer grips the pipe.
- The metal base is bent, rusted through, or installed wrong (for example, top edge not tucked under the upper shingle course).
Knob note: If the rubber boot is cracked, sealant is a bandage on a tire. It might hold for a storm, but it is not where you want to place your trust.
Option 1: Reseat and reseal
If the boot is in good shape, start with the least invasive fix.
1) Lift shingles carefully
Use a flat pry bar to gently loosen the shingle tabs around the flashing. You are not trying to remove shingles, just to access fasteners and check layering. Be aware that factory adhesive strips can hold tight, and in cool weather the tabs can be brittle, so go slowly.
2) Re-secure the base
- If nails have backed out, pull them and replace with roofing nails driven into solid decking.
- Keep fasteners where they belong: typically near the edges of the flashing base where shingles will cover them. Avoid putting nails where they will be exposed to runoff, especially along the lower edge.
3) Seal only where it makes sense
- Apply a small amount of roofing sealant under lifted shingle tabs if they will not lie flat again.
- Add a dab of sealant over nail heads that must remain exposed (ideally there should be very few).
- If your boot has a collar at the top, you can add a thin bead where rubber meets pipe, but do not pile it up.
Let the shingles settle back down and press them into place.
Option 2: Replace the boot
This is the standard fix for a leaking plumbing vent flashing, and it is very doable if you can work safely and patiently.
1) Choose the correct replacement
Match these three things:
- Pipe size (commonly 1.5 to 4 inch; 2 and 3 inch are most common)
- Roof type (asphalt shingles vs metal roof)
- Material (rubber is common; silicone handles sun exposure better in hot climates)
If you cannot lift shingles enough without breaking them, or you are working around a tricky penetration, ask about retrofit split boots. In some regions you will also see lead or copper flashings, which can last a long time when properly installed.
2) Remove nails and free the old flashing
Gently lift the shingles above the flashing base and remove the nails holding the flashing. Work slowly so you do not tear the shingle mat.
Most plumbing vent flashings are installed so the top half of the base is under the shingles above, and the bottom half sits on top of the shingles below. That layering is what keeps water moving down and out.
3) Slide the old flashing up and off
Once nails are out, you can usually wiggle the flashing up the pipe and remove it. If it is stuck to sealant, use the utility knife to cut sealant carefully.
4) Prep the area
- Scrape away brittle old roofing cement lumps where they interfere with flat contact.
- Check the roof deck opening around the pipe. If you see soft, punky wood, stop and consider pro help. That can indicate ongoing rot.
- Inspect shingles in the surrounding 12 to 18 inches for cracks or broken corners.
- In snow and ice country, pay attention to the cut and sealing around any ice-and-water shield or underlayment at the penetration. A bad cut or failed underlayment seal can also be a leak source, even with a new boot.
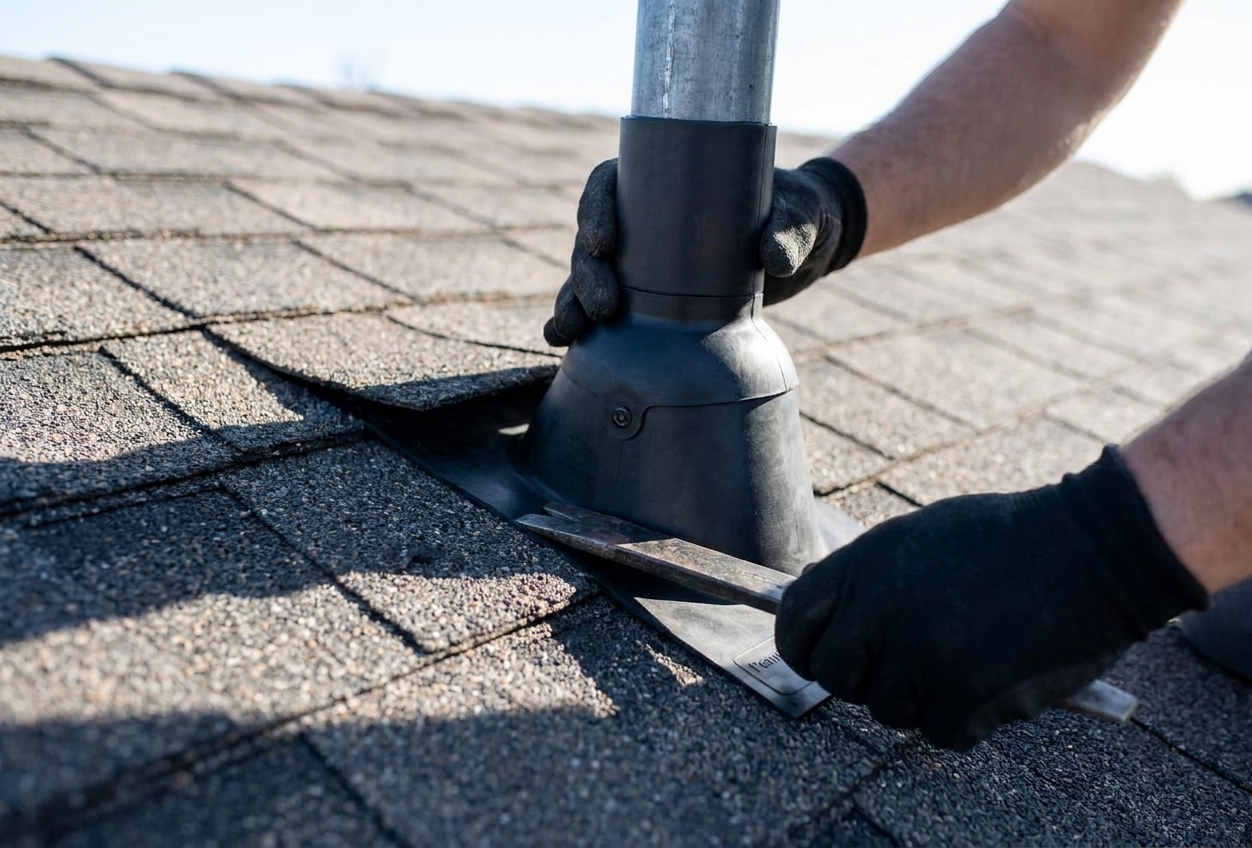
5) Install with correct layering
- Slide the new flashing over the pipe until the base lies flat on the shingles.
- Tuck the top edge of the base under the shingles above the pipe.
- Leave the bottom edge on top of the shingles below so water sheds over it.
- Nail the flashing base only in the manufacturer-recommended locations, using nail length that bites into the roof decking. As a rule, avoid nailing the lower edge where water runs.
- Re-lay the shingles and re-nail any shingles you had to loosen enough to remove nails.
6) Seal the right points
- Put a small amount of roofing sealant under shingle tabs you lifted if they do not bond back down.
- Seal any exposed nail heads with a dab.
- Do not run a big bead around the entire flashing base. If the flashing is properly lapped with shingles, it does not need to be caulked in.
Check nearby shingles
Even with a new boot, leaks can continue if the shingles around the pipe were damaged or installed awkwardly.
What to look for
- Cracked shingle tabs from prior lifting or age
- Nail pops uphill of the flashing that let water in and run down to the vent opening
- Gaps where shingles do not lay flat against the flashing base
- Exposed fasteners in the water channel above the pipe
Minor repairs you can do
- Replace a cracked shingle if you can lift, slide, and re-nail without ripping surrounding courses.
- Reset nail pops by pulling the old nail, pressing the shingle flat, and driving a new nail slightly above the old hole. Seal the old hole and any exposed nail head.
- Re-seal lifted tabs with a small amount of roofing sealant under the tab.
Test your repair
Wait until sealant has skinned over per the product directions, then do a controlled hose test.
- Have one person inside the attic with a flashlight.
- Have one person on the ground with a hose. You do not need pressure, just steady water.
- Avoid a high-pressure nozzle and do not spray upward under shingle laps. The goal is to mimic rain, not force a leak.
- Start below the vent and work uphill. This helps you isolate the entry point.
- Run water for several minutes at each level before moving up.
If you still see water, the source may be higher than the vent and simply traveling along framing. In that case, broaden your inspection to nearby penetrations, valleys, and roof-to-wall transitions.
When to call a pro
It is smart to bring in a roofer or qualified contractor if:
- You see soft roof decking or signs of rot around the vent opening.
- The leak has been active long enough to cause mold or insulation saturation.
- Your roof covering is tile, slate, cedar, or a complex metal system.
- You suspect the vent pipe itself is loose or the roof penetration is oversized.
- You are in heavy snow country and suspect underlayment or ice-dam issues around the penetration.
FAQ
Can I just caulk around the pipe where it meets the boot?
You can add a thin bead as a secondary seal, but it should not be your main plan. Many leaks happen because the boot is cracked or the flashing base is not properly lapped with shingles. Fix the assembly first.
How long do rubber vent boots last?
It varies by sun exposure and climate. On roofs with heavy UV and heat, rubber can crack sooner. If your boot looks dry, brittle, or split, replacement is usually the best use of your time.
What if my vent pipe is cast iron instead of plastic?
The flashing concept is the same. The key is matching the boot to the pipe size and making sure it grips well. If the pipe is rough or corroded where the boot seals, consider having a pro evaluate the best flashing option.
Should the flashing base be nailed on all sides?
Typically, no. Follow the flashing manufacturer’s nail pattern, and aim to place nails where shingles will cover them. Avoid nailing the lower edge where water runs, and use nails long enough to hit the roof decking securely.
Quick checklist
- Boot has a snug fit around the pipe with no cracks.
- Top of flashing base is tucked under the upper shingles.
- Bottom of flashing base sits on top of the lower shingles.
- Few to no exposed fasteners, and any exposed nail heads are sealed.
- Nearby shingles are flat, uncracked, and properly fastened.
If you checked those boxes, you have done the kind of repair that holds up through storms, not just through optimism. Now, wipe your hands, pack up the tools, and let the roof do what it does best: shed water and mind its own business.