
How to Repair a Broken Toilet Flange
Learn how to fix a cracked, rusted, or low toilet flange so your toilet stops rocking and leaking. Covers repair rings, spacers, new bolts, and full flange replacement.
In my world, a rocking toilet is never “just annoying.” It is a flashing warning light that something under the bowl is loose, broken, or sitting at the wrong height. Sometimes it is as simple as shimming and tightening. But when the toilet flange is cracked, rusted out, or buried too low below the finished floor, that wobble can turn into a sewer gas smell, a ceiling stain downstairs, or a soft, rotten subfloor.
The good news: a broken toilet flange is one of those repairs that sounds scarier than it is. If you can lift a toilet safely and run a few screws into solid framing, you can handle most flange fixes in an afternoon.
First: Is it really the flange?
Before you start buying parts, do a quick reality check. A toilet can rock for a few different reasons.
It might be a simple reseat
- Toilet rocks, but flange looks intact: The bowl may be sitting on an uneven tile, the closet bolts are loose, or the toilet simply was not set down square.
- No cracks, no rust-through, flange is at floor height: You may only need to reset the toilet with a new wax ring, tighten bolts evenly, and shim any gaps. (If the toilet has moved at all, assume the old wax is done.)
Signs the flange needs repair
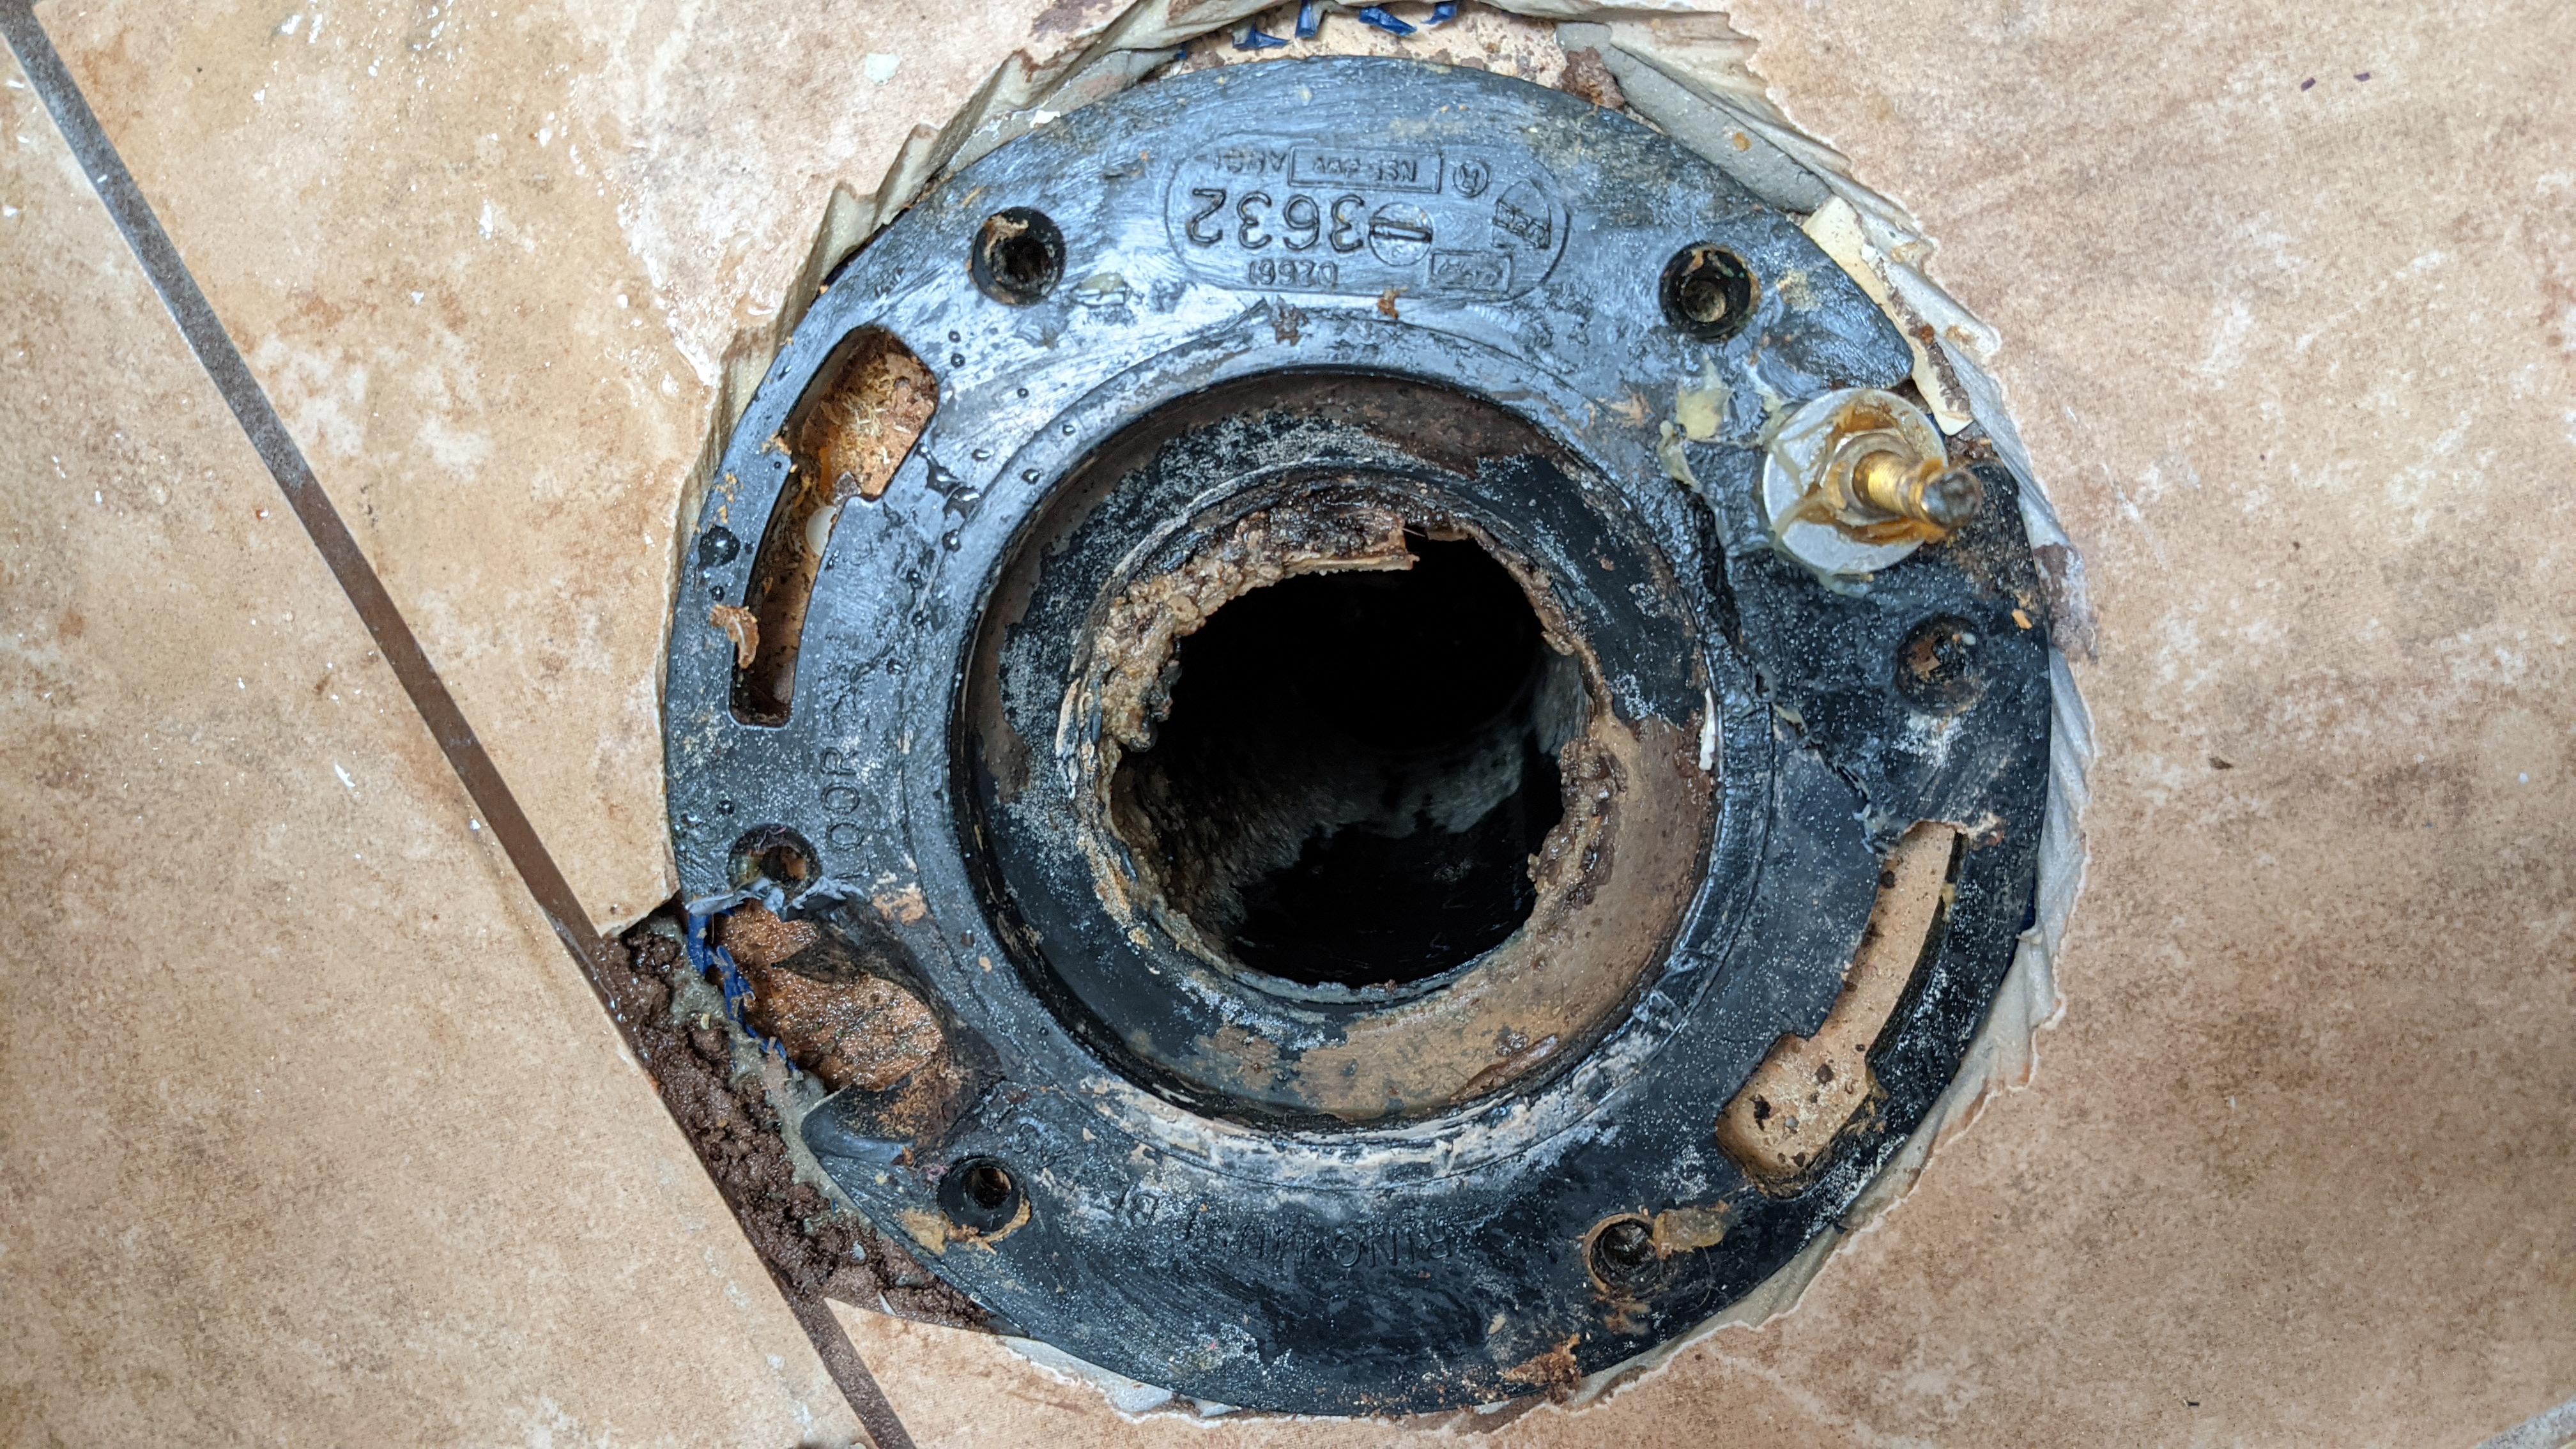
- Cracks in the flange ring, especially at the bolt slots.
- Rust or rot so bad you can flake it off with a screwdriver.
- Closet bolts won’t stay tight because the slots are stretched or broken.
- Flange sits below the finished floor (tile, LVP, etc.), which makes it harder to compress the wax ring correctly.
- Water stains or soft flooring around the toilet base, which often means the seal has been compromised for a while.
Quick safety note: If you have any suspicion the subfloor is soft or rotted, plan to investigate. A “flange repair” on mushy wood is like hanging a door in wet cardboard. It will not hold.
Tools and materials
You will not necessarily need all of this, but here is what I keep on hand for a flange job.
Tools
- Adjustable wrench or deep socket set (for closet bolts)
- Putty knife (scraping old wax)
- Screwdriver or nut driver
- Drill and bits
- Shop vacuum and rags
- Utility knife
- Level (small torpedo level is perfect)
Materials (pick based on your situation)
- New wax ring (standard or extra-thick) or a wax-free gasket
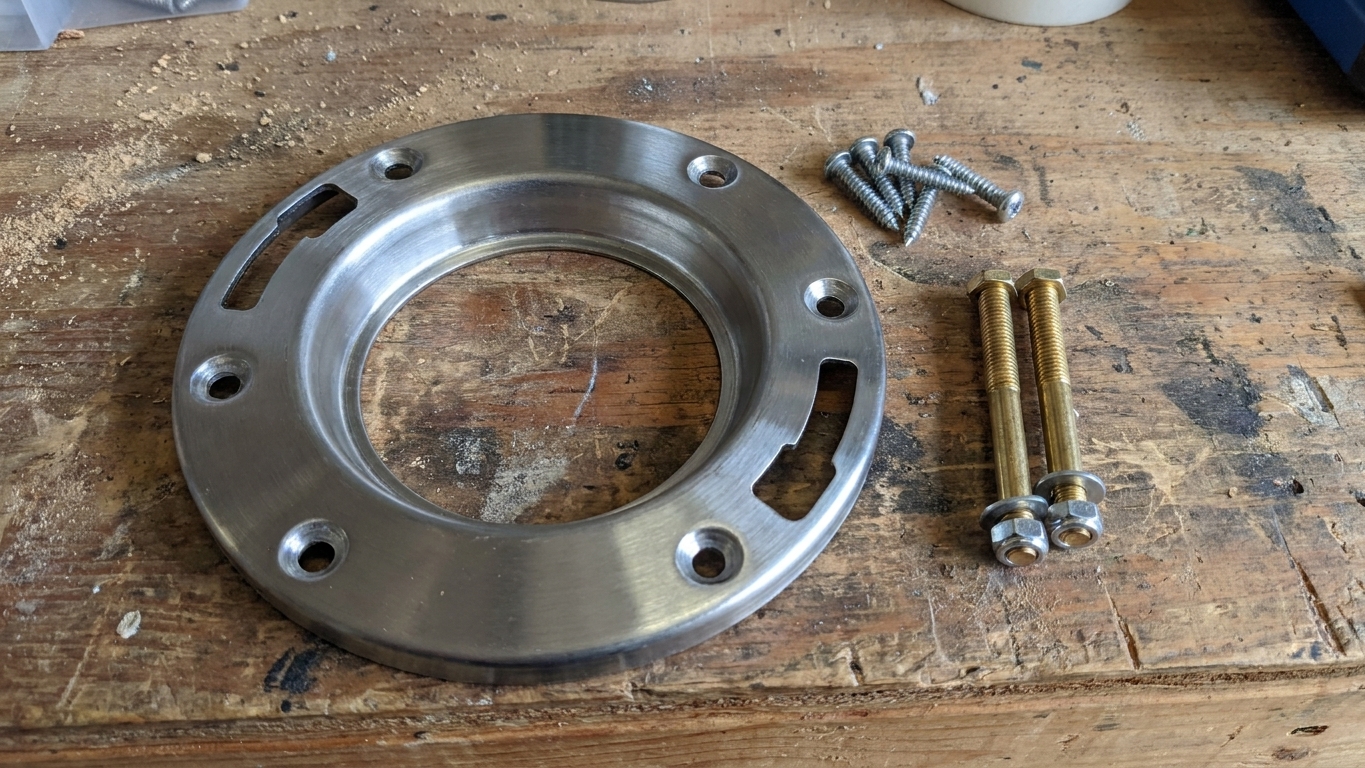
- New closet bolts and nuts
- Flange repair ring (also called a flange reinforcement ring)
- Flange spacer kit or flange extender (for low flanges)
- Stainless or coated screws (often #10 or #12)
- Plastic toilet shims
- Bathroom caulk (optional, for final sealing)
- New toilet supply line (optional, but smart if yours is old or stiff)
Step-by-step: Remove the toilet
If you are repairing the flange, the toilet has to come up. Take your time. Toilets are awkward, not difficult.
Handling note: Porcelain is heavier than it looks and the weight is not balanced. Gloves help, and a helper is even better. If you are solo, clear a path first and have a towel or cardboard ready so you can set the toilet down without chipping it.
- Shut off the water at the stop valve behind the toilet.
- Flush and hold the handle down to empty the tank, then sponge out the remaining water.
- Disconnect the supply line from the bottom of the tank.
- Pop the bolt caps and remove the nuts on the closet bolts.
- Break the seal by gently nudging the toilet side to side just enough to free the wax, then lift straight up. Do not reef on it if the flange is already compromised.
- Plug the drain by loosely stuffing a rag in the opening to block sewer gas and keep hardware from falling in. Do not push it down the pipe.
Then scrape all the old wax off the flange and the underside outlet (horn) of the toilet. The cleaner you get it, the better your new seal will be.
Pick the right repair
Most flange repairs fall into one of these three categories. Match the fix to the failure.
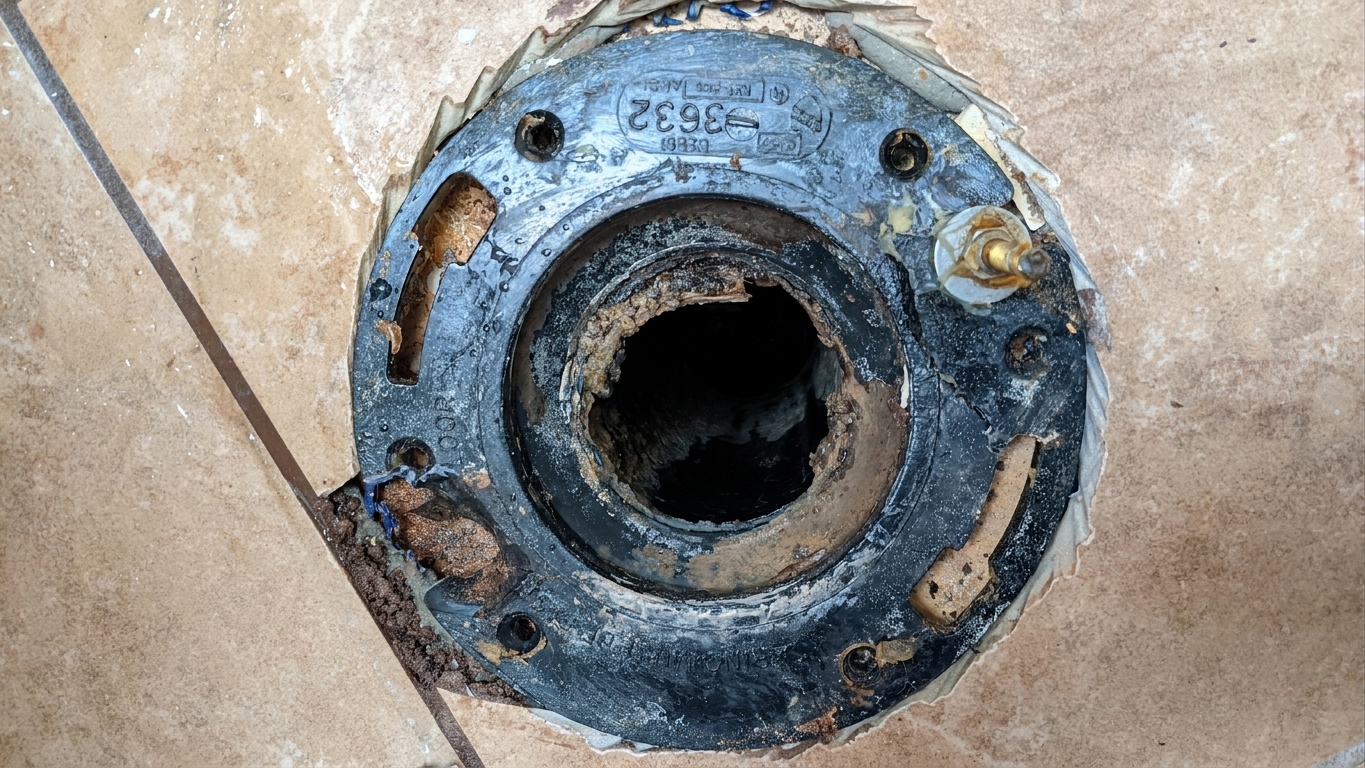
Problem 1: Flange ring is cracked or bolt slots are broken
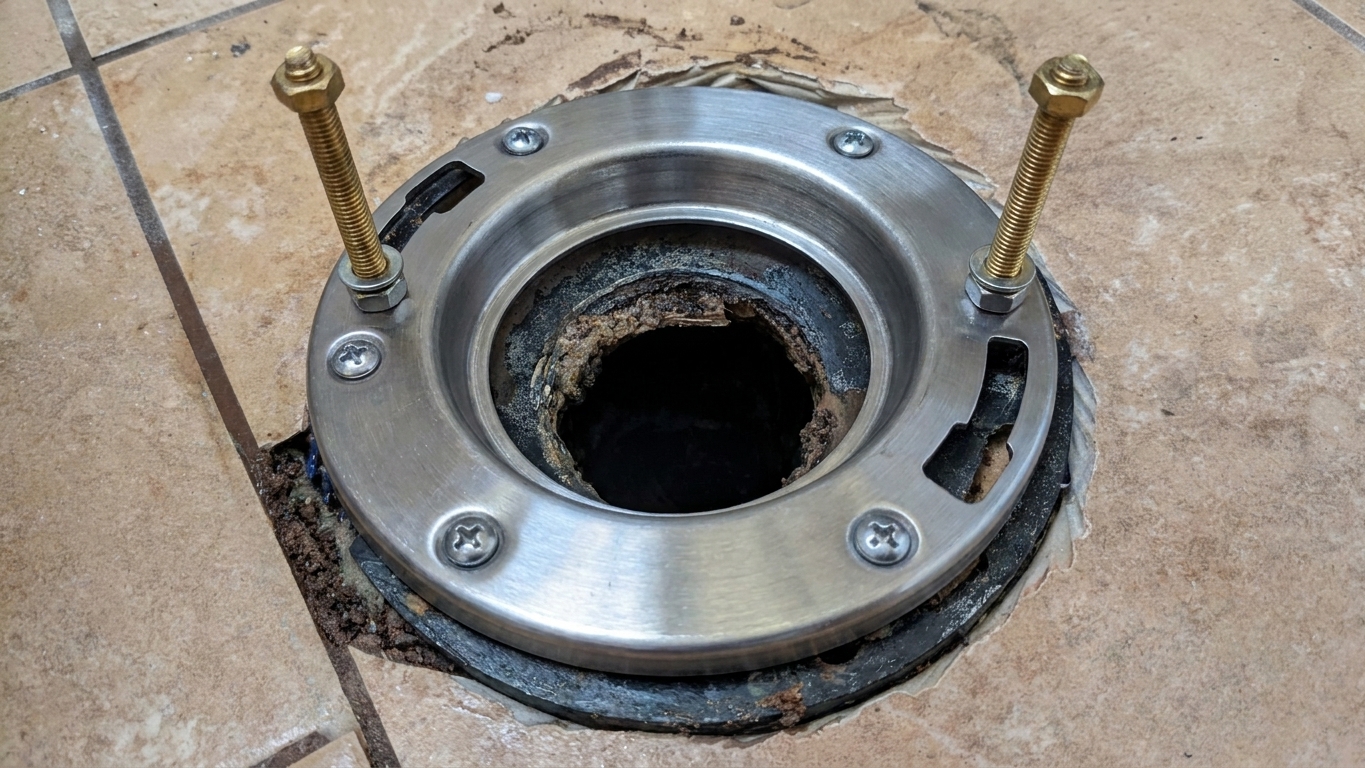
If the pipe connection is still solid but the ring that holds the bolts is damaged, a flange repair ring is usually the cleanest fix.
How to install a repair ring
- Dry fit the ring over the existing flange. Rotate it until you can hit solid wood with screws. If your floor is concrete, you will need masonry anchors.
- Set new closet bolts in the repair ring’s slots (or confirm your ring captures the old slots securely).
- Screw the repair ring down using stainless or coated screws into solid subfloor or added blocking. If your subfloor is questionable, fix that first. A repair ring cannot make rotten wood strong.
If your repair ring has a split design, install it so the split is not lined up with a weak area of the old flange. Think of it like reinforcing a cracked picture frame: you want the new piece spanning the damage.
Problem 2: Flange sits below the finished floor
This is extremely common after new tile or a thicker floor goes in. Ideally, the top of the flange sits on top of the finished floor or about 1/4 inch above it. When it sits low, the wax ring may not compress enough, and you can end up with leaks or sewer gas smells.
A low flange does not usually cause rocking by itself. Rocking is almost always an uneven floor, loose bolts, or a flange that is not anchored. But a low flange often shows up alongside those problems, and it can definitely make the reset harder.
Best fix: flange extender or spacer
A flange extender (sometimes sold as a spacer kit) raises the sealing surface. Many kits stack in thin layers so you can dial in the height.
- Measure the drop from the finished floor to the top of the flange.
- Choose extender thickness to bring the flange up to floor height (or slightly above).
- Clean and dry everything so the extender sits flat.
- Install the extender per the kit instructions. Many use a bead of silicone between layers and between extender and old flange.
- Run screws through the extender and into solid backing if the kit is designed for it.
Wax ring tip: When the flange is still a little low, some homeowners grab an extra-thick wax ring. That can work, but stacking two wax rings is a gamble. I prefer raising the flange with an extender whenever possible, then using a single wax ring.
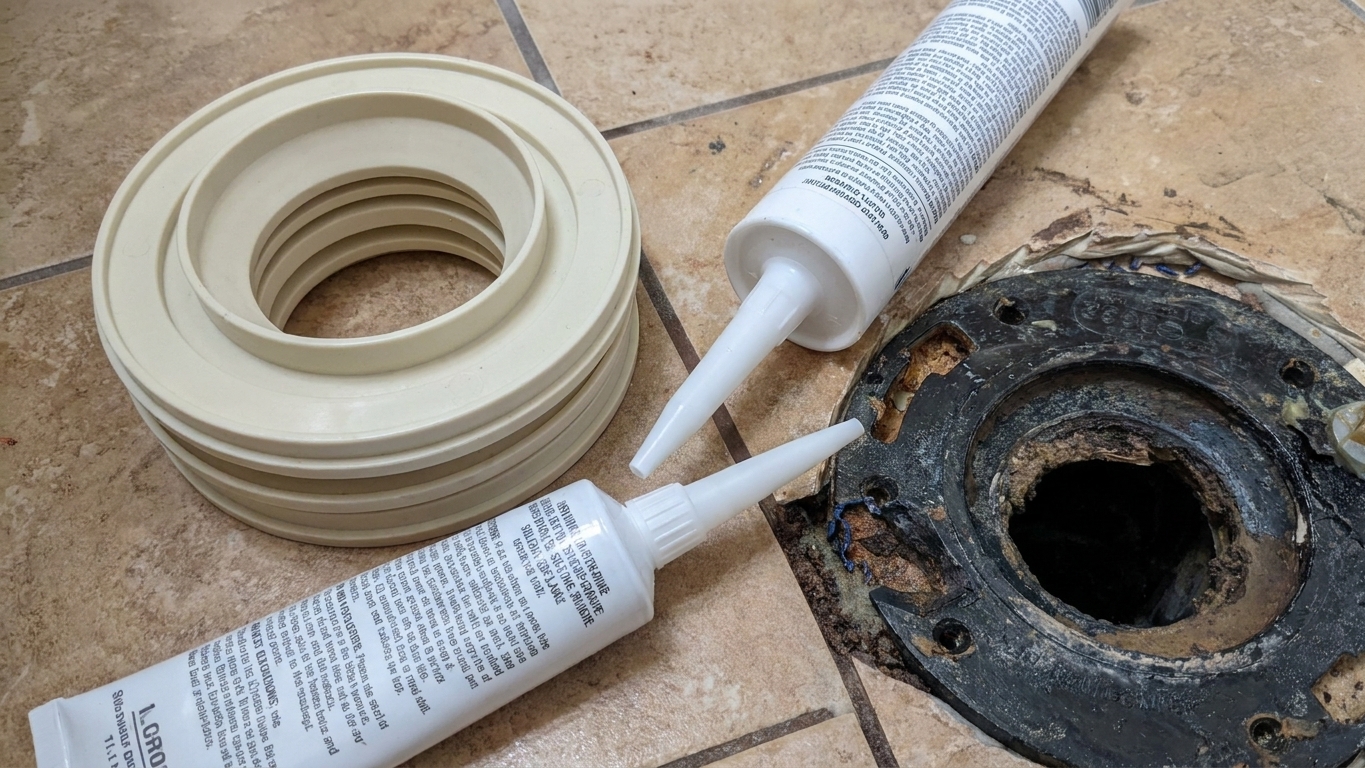
Problem 3: Flange is rusted out, loose, or the pipe connection is failing
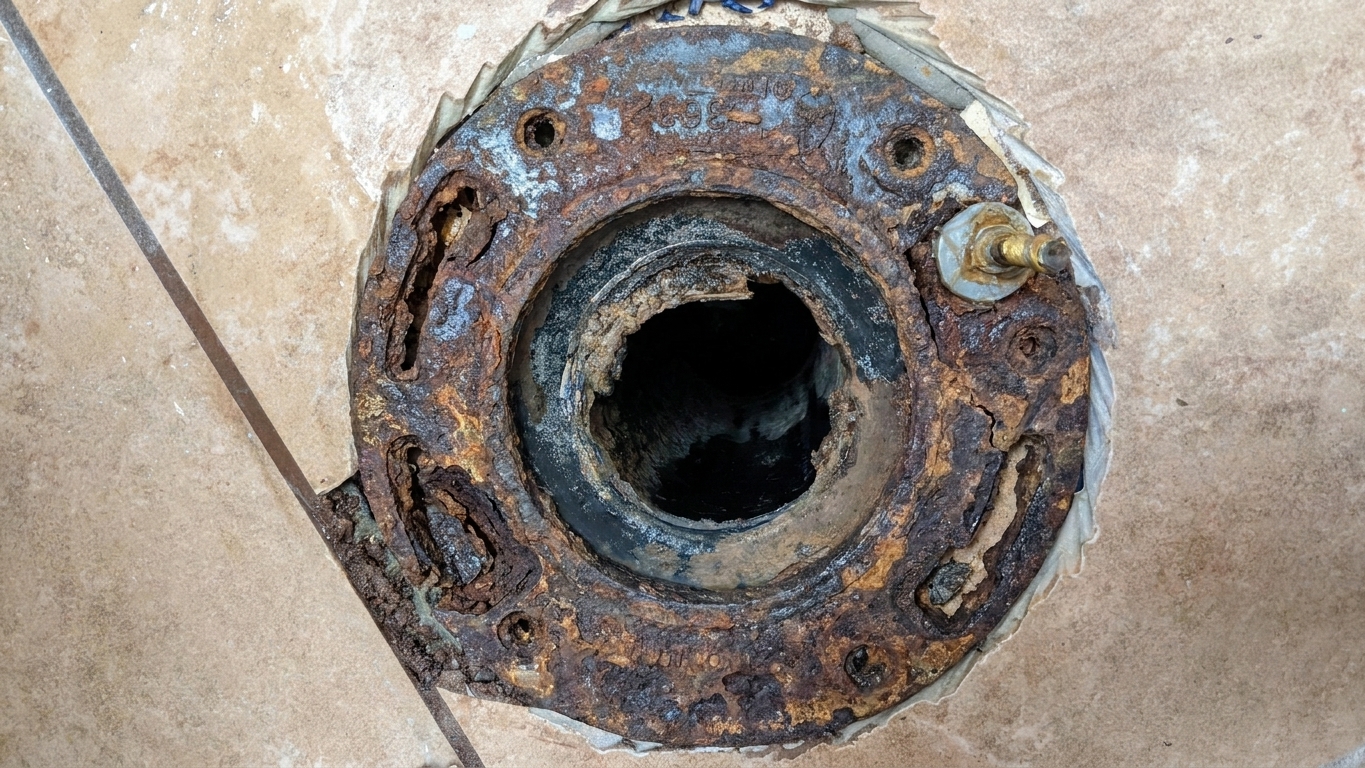
If the flange is broken where it meets the pipe, or it is so corroded that screws will not hold, it is time to replace the flange. This is where you slow down and identify what you are working with.
Identify your drain pipe material
- PVC (white plastic): Often uses a flange glued inside or outside the pipe.
- ABS (black plastic): Similar to PVC, but uses ABS cement.
- Cast iron (dark metal): May use a lead-and-oakum joint, a compression style flange, or a flange that sits on top with a gasketed insert.
Replacement approaches (what to expect)
- Plastic pipe with solvent-weld flange: Replacement often involves cutting the pipe and using a repair flange or an inside-fit flange with the correct cement. If you are not comfortable cutting and setting pipe height, this is a solid point to call a plumber.
- Cast iron: Many homeowners have success with a repair flange that anchors to the floor and seals inside the cast iron pipe with an insert or gasket. The right product depends on what you have, like hubbed versus no-hub pipe, the inside diameter, and the condition of the pipe wall.
When to bring in backup: If your drain line is cast iron and the existing flange is leaded in, or if the only way forward is cutting and reworking the drain pipe, a plumber can be worth every penny. A bad flange replacement can mean a hidden leak you do not notice until the subfloor turns into oatmeal.
How to reset the toilet
Once the flange is repaired and secure, the rest is about getting a clean seal and a stable base.
1) Install new closet bolts
Even if the old bolts look fine, replacing them is cheap insurance. Use brass or stainless if possible.
2) Set the wax ring
There are two common approaches:
- Wax on the toilet outlet: My preference. It stays put while you lower the toilet.
- Wax on the flange: Works too, just easier to bump.
If you use a wax ring with a plastic horn, make sure it is compatible with your flange setup and does not restrict the opening.
3) Lower the toilet straight down
This is the whole game. Hovering and scooting smears wax. Line up the bolts, then lower the bowl straight down until it contacts the floor.
4) Tighten evenly, do not crank
Tighten the nuts a little at a time, alternating sides. Stop when the toilet is stable. Over-tightening can crack a porcelain base, and that is the kind of mistake that makes a grown DIYer sit quietly on the garage steps for a minute.
5) Shim if needed
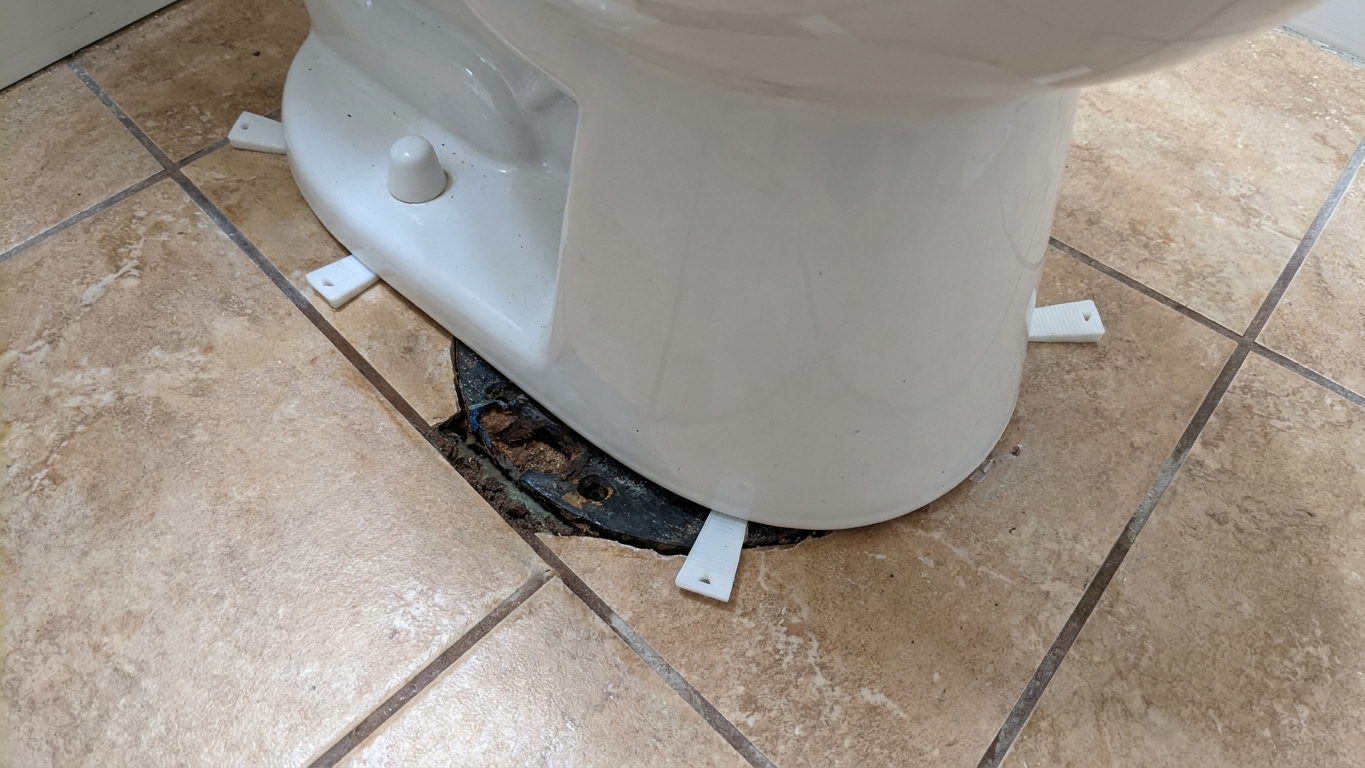
If the floor is uneven, use plastic toilet shims. Tap them in gently at the low spots, then snug the nuts again. Trim shim ends with a utility knife. If you want a cleaner finished look, a small dab of caulk over the exposed shim ends does the trick.
6) Reconnect water and test
- Reconnect the supply line. If the old one looks crusty, kinked, or stiff, replace it now.
- Turn water on slowly and let the tank fill.
- Flush several times.
- Check for leaks around the base and at the supply connection.
7) Caulk (optional, but smart)
Many pros caulk around the front and sides of the toilet and leave the back open so a leak shows itself instead of hiding. If you caulk, do it after you are 100 percent confident it is not leaking.
Troubleshooting
The screws will not bite
- You may be hitting rotted wood, thin underlayment, or empty space.
- Solution: locate solid subfloor, add blocking from below, or use an appropriate anchoring method for your subfloor type.
The flange spins or lifts when I tighten bolts
- The flange is not anchored to the floor properly.
- Solution: remove the toilet again and secure the flange or repair ring with the right screws into solid material.
The toilet still rocks after everything is “tight”
- Usually an uneven floor, missing shims, or a flange that is not solidly fastened.
- Solution: back off nuts slightly, shim, then retighten evenly.
I smell sewer gas but do not see water
- A compromised seal can leak air without obvious water leakage.
- Solution: pull the toilet and reset with a new ring after confirming the flange height and stability.
FAQ
Can I repair a flange without removing the toilet?
Not in any reliable way. Anything that truly fixes a cracked, rusted, or low flange requires access under the bowl.
Should the toilet flange be on top of the tile?
Yes, ideally. The flange should sit on top of the finished floor or about 1/4 inch above it. If it is below, use an extender or spacer so the seal is made at the correct height.
Do I need a repair ring or a full replacement?
If the pipe connection is solid and the damage is limited to the ring and bolt slots, a repair ring is usually enough. If the flange is loose at the pipe, severely rusted, or broken where it connects, plan on replacement.
Is a rocking toilet always a wax ring issue?
Nope. A wax ring does not stop rocking. A solid flange, solid subfloor, and proper shimming do. The wax ring is the seal, not the structure.
My rule of thumb
If the flange is solid, at the right height, and screwed down tight, a toilet reset is straightforward and boring. And in plumbing, boring is a compliment. Take the time to make the flange right, and you will stop the rocking, stop the leaks, and stop thinking about that toilet for a long, long time.