A homeowner-friendly breakdown of what really clogs sinks, tubs, and toilets, plus simple prevention habits and safe DIY fixes before you call a plumber.
The Homeroom Fix
October 28, 2026
•
By Marcus Delgado
How to Unclog a Bathroom Sink
Clear a clogged bathroom sink by removing the pop-up stopper, cleaning hair off the pivot rod, and rinsing out the P-trap under the basin. No harsh chemicals required.
The fastest way to unclog a bathroom sink is often not a plunger, boiling water, or a chemistry set under your cabinet. Most of the time it is hair and toothpaste sludge tangled right where the sink is designed to “catch” things: the pop-up stopper and the little P-trap below.
I grew up in a house where “call a plumber” was basically a swear word. My grandpa would hand me a flashlight and say, “Most clogs are honest work, not mystery.” He was right. If your sink is draining slowly or not at all, you can fix it with a towel, a small bucket, and about 20 minutes of patience.
Before you start: what you are fixing
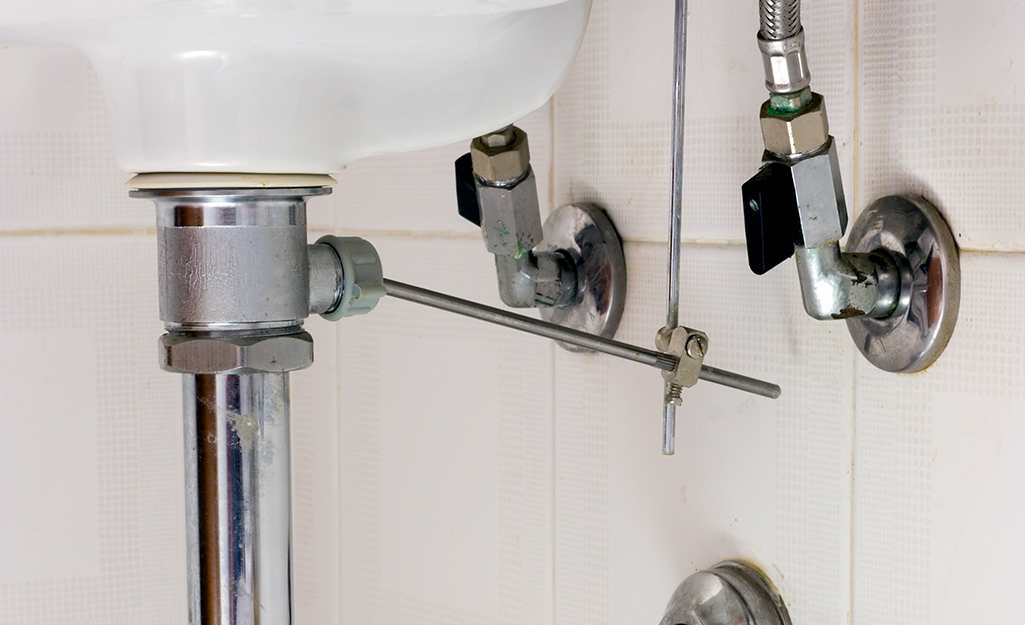
A typical bathroom sink has two prime clog zones:
- The pop-up stopper area inside the drain body. Hair wraps around the stopper and the pivot rod.
- The P-trap (the curved pipe under the sink). It holds water to block sewer gas, and it also catches heavier gunk.
If you only snake from the top without removing the stopper, you are fighting the clog through a tiny opening. If you only dump drain cleaner, you can damage old pipes and still leave a hair sweater behind.
Tools and supplies
- Small bucket or pan
- Old towel or rag
- Adjustable pliers or channel-lock pliers (optional, for tight slip nuts)
- Disposable gloves
- Flashlight
- Plastic drain snake or zip tie (optional)
- Dish soap and an old toothbrush (nice for cleaning parts)
Good news: Many bathroom sink traps are tubular and hand-tightened, so they come apart without tools. If yours is older chrome or brass, those slip nuts can seize up and you may need pliers and a little patience.
One quick check: If you look under the sink and see a trap that is glued (no slip nuts, just smooth fittings and glue joints), do not try to “unscrew” it. In that case, stick to cleaning the stopper area first and use a small hand snake from the wall stub-out only if you can remove a slip-joint connection safely.
Step 1: Set up for a not-gross cleanup
- Clear everything out from under the sink.
- Put a towel down under the trap.
- Set a bucket directly under the P-trap curve.
Even a “dry” clog has water sitting in the trap. If you skip the bucket, your cabinet bottom becomes the bucket.
Step 2: Set the stopper position
Look behind the faucet for the little rod you pull up and push down to open and close the drain.
- Move the lift rod to put the stopper in its lowest position. On most sinks, that is with the rod pushed down, but linkage adjustment varies.
- Shine a flashlight down the drain and confirm the stopper is seated down in the drain.
Step 3: Remove the pivot rod
Now get under the sink and find the drain pipe coming down from the basin. A few inches below the sink, you will see a horizontal rod going into the drain body. That is the pivot rod. It is held in place by a small nut (often plastic).
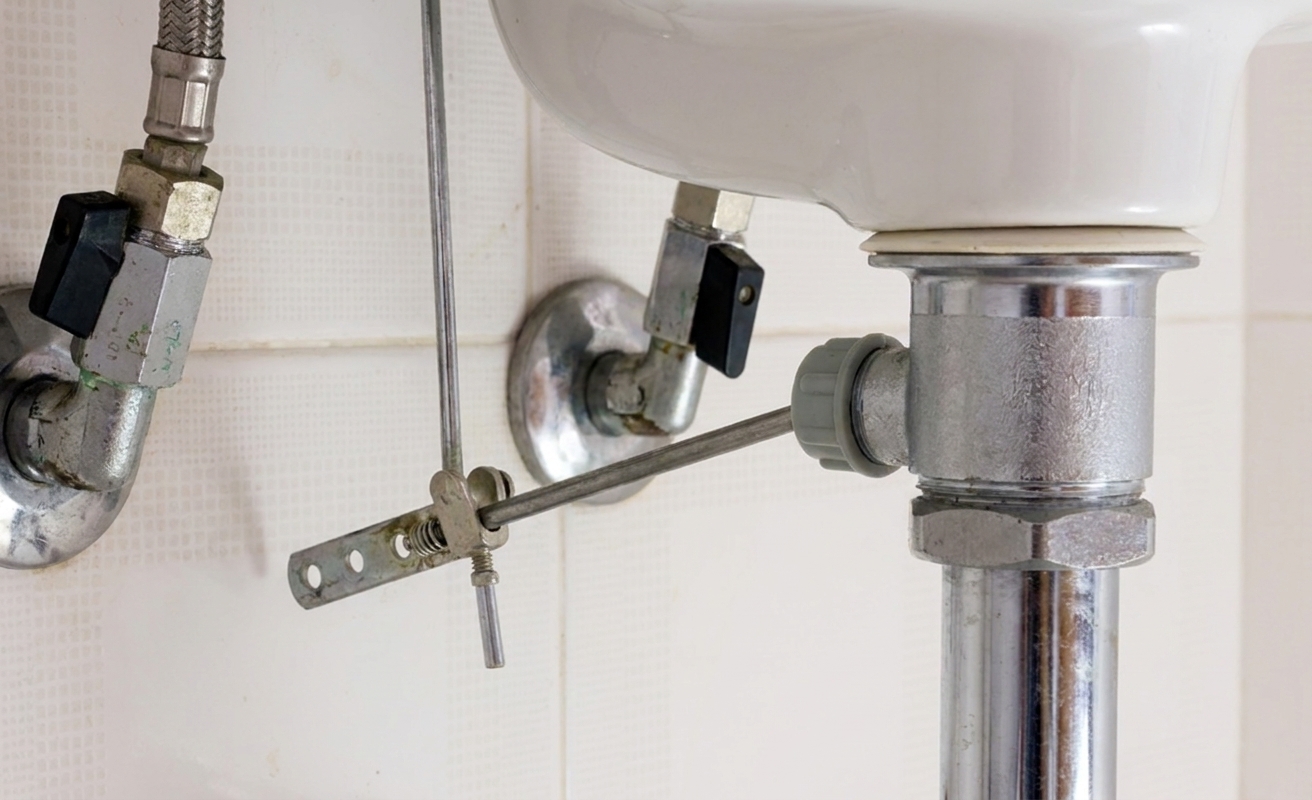
- Unscrew the pivot rod retaining nut by hand if you can. If it is snug, use pliers gently.
- As you loosen it, watch for a small plastic ball-and-socket washer or seal at the pivot. Do not lose it. Put the pieces aside in the order they came off.
- Pull the pivot rod straight out.
Tip from the jobsite: Hold the rod level as you pull it out. Sometimes it hooks the stopper and you do not want parts dropping unexpectedly.
Step 4: Pull the stopper and remove hair
With the pivot rod removed, the stopper is no longer locked in.
- From above, lift the stopper straight up and out.
- Remove the hair and gunk from the stopper and from the drain opening.
- Wipe the inside lip of the drain with a rag. If it is slimy, a little dish soap helps.
This is the “problem child” in most bathroom sink clogs. The stopper design is great at catching a wedding ring. It is also great at catching every hair you have ever shed.
Safety note: If you already poured chemical drain cleaner in the sink, treat everything in that drain like it can burn you. Wear gloves and eye protection, ventilate the room, and do not mix chemicals. If the sink is holding liquid, do not add more water on top of it. Bail out the standing liquid carefully and avoid splashing. If you are unsure, stop and call a pro.
Step 5: Clean the P-trap
If the sink was fully clogged or still drains slow after cleaning the stopper area, clean the trap next.
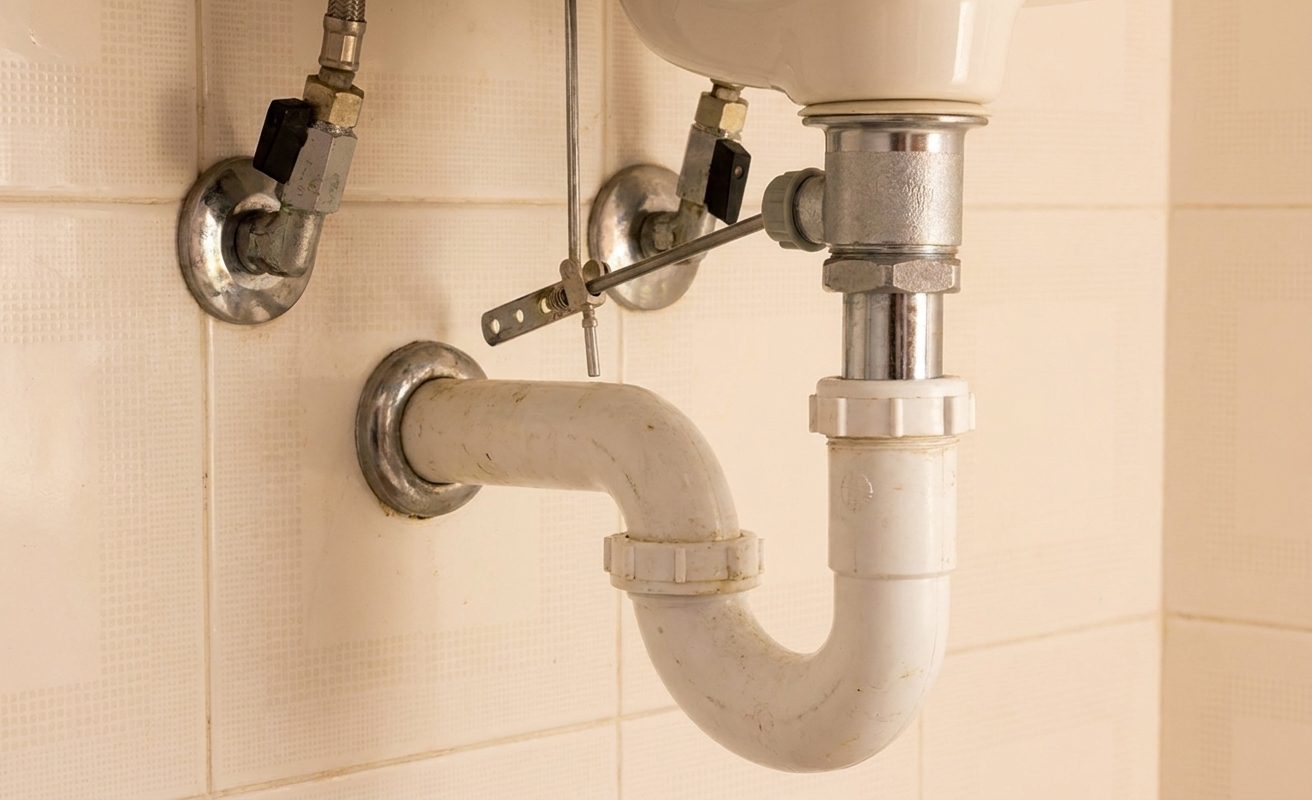
- With the bucket in place, loosen the two slip nuts on the P-trap (one at each end). Most loosen counterclockwise by hand.
- Carefully lower the trap and dump the water into the bucket.
- Check inside the trap for a wad of hair, toothpaste sludge, or a lost bobby pin.
- Rinse the trap in a sink or tub, or wipe it clean with a rag.
What you are looking for: anything that narrows the trap opening. Even a half-plug can turn a decent drain into a slow one.
Step 6: Reassemble and prevent leaks
Reinstall the P-trap
- Put the trap back in place and make sure the trap arm seats fully into the wall stub-out (if yours connects there).
- Thread both slip nuts on by hand first so you do not cross-thread them.
- Make sure the slip-joint washers are seated correctly. The tapered, cone-shaped side typically faces into the fitting it is sealing.
- Tighten until hand-snug. If you use pliers, go gently. Over-tightening can crack plastic nuts or distort washers.
Reinstall the stopper and pivot rod
- Drop the stopper back into the drain from above.
- From below, slide the pivot rod back into the drain body. You may need to wiggle the stopper a bit so the pivot rod catches the hole at the bottom of the stopper.
- Reinstall any small pivot washers or seals in the same order they came off, then thread the retaining nut back on and snug it up.
- Test the lift rod up and down. The stopper should move smoothly.
Quick leak check: Run water for 30 to 60 seconds while watching the slip nuts and the pivot rod nut. If you see a drip, tighten just a touch more.
If it still leaks: Stop the water, loosen the nut, and re-seat the washer squarely. Most persistent drips are a washer that is cocked, missing, installed backward, or a nut that got cross-threaded.
If it still drains slow
After cleaning the stopper and trap, most sinks drain like new. If yours does not, here are the next likely culprits:
- Clog further down the wall drain: The pipe going into the wall may have buildup. A small hand snake can help, but keep the bucket and towel handy.
- Vent or drainage issue: Rare for a single sink, but if it gurgles a lot or multiple fixtures act up, it may not be a simple hair clog.
- Old galvanized plumbing: In older homes, pipes can narrow from corrosion inside. That is more of a repair than a cleaning.
If you remove the trap and the wall pipe is packed with sludge, or you see standing water that will not drop, that is a good time to bring in a plumber. No shame. Knowing when to tag out is also DIY skill.
How to prevent the next clog
- Pull hair from the stopper weekly. It takes 30 seconds and saves you the whole show later.
- Avoid rinsing toothpaste globs and heavy creams. Run water a few seconds longer after brushing.
- Use a simple drain screen if your sink setup allows it, especially if you shave over the sink.
- Skip harsh drain cleaners as routine maintenance. They can be rough on old pipes and often do not remove hair knots.
FAQ
Do I need a plunger for a bathroom sink?
Usually no. A bathroom sink clog is typically hair caught at the stopper or in the P-trap. That said, for a minor soft clog (soap scum, toothpaste sludge), hot water with a squirt of dish soap or a few good plunges can bring it back to life.
If you do plunge a bathroom sink, plug the overflow hole first with a wet rag, or you will not build pressure.
What if the pivot rod nut is stuck?
Try a gentle grip with adjustable pliers and turn slowly. If it is plastic, do not crush it. If it will not budge, you can often clean the trap first and come back later with better access.
My stopper will not reconnect. What am I doing wrong?
Most of the time, the pivot rod is not going through the hole at the bottom of the stopper. Pull the stopper up slightly while guiding the pivot rod in until it “catches,” then test the lift rod movement before tightening everything fully.
Is it normal for the sink to smell after I take the trap off?
Yes. The trap water is what blocks sewer gas. Once you reassemble and run water, the smell should go away. If it does not, double-check that the trap is installed correctly and not leaking.